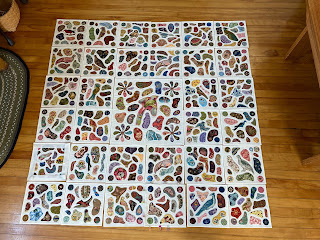
I laid all of the blocks on the floor over the weekend. Some are still not finished, but you get the idea.
Now on to the borders and corner blocks. Still in the design stage, but should get a start on them before Christmas. Nothing else to do right?
Not sure if it was his eye or just the blah color of his head, but I couldn’t live with him amongst all those other pretty birds. So… off with his head and on with a more colorful and cheerful noggin.
I won’t be afraid to sleep under it now!


LOL....decapitated! too funny...beautiful blocks
ReplyDeleteSuch an amazing quilt! I really love it!
ReplyDeleteLol! I hope the decapitated head doesn't come back to haunt you! Love the quilt AND the story!
ReplyDeleteHaha @ off with his noggin. It's beautiful
ReplyDeleteYour potholder quilt really caught my eye when I saw the beautiful handquilting, so I went back through all of your posts to the beginning of this adventure. You have done a great job. I am a little puzzled by the name potholder quilt. I don't guess I have heard of that before. I would like a little more info on that technique if you have it. Thanks. I also enjoyed looking through your other posts while I was on my way to the beginning of the potholder quilt. Somehow I have missed these. I do get your emails.
ReplyDeleteThanks Pamela! If you go to my January 25, 2019 post titled Potholder Quilts 101, you will find out more about this method. There is no official name to this method, I have just always called it the potholder method since I saw my first antique one back in the early 1980's. It is different from other quilt as you go methods because each block is individually quilted and bound and can actually be considered finished before I stitch the blocks together to form the quilt.
DeleteGorgeous quilt and the idea to use toiles on the back is brilliant! Can’t wait to see the borders!
ReplyDeleteI love this idea for a quilt - unusual, fun and gorgeous. I feel inspired to make one with lots of birds, butterflies, flowers and other gardening related items.
ReplyDeleteOh, so lovely! I'm thinking of trying your method for a small quilt to see how it goes.
ReplyDeleteWow! What a treasure! You make the most wonderful things.
ReplyDeleteSuch an amazing quilt--love the toile backings and the birds, of course!
ReplyDeleteYou really dish up your creativity in this awesome quilt.
ReplyDeleteJust stunning, Wendy. But I never thought I'd see you decapitating birds!! LOL
ReplyDeleteI love this quilt from the back and the front. Lovely either way! But much more work to create that loveliness on the front.
The back of that quilt is going to be as pretty as the front with all those toile prints included!
ReplyDeleteI love your beautiful quilt Wendy !! Absolutely gorgeous ... the top and the back !
ReplyDeleteI laughed when you changed up the bird! Isn't it funny the things that just have to GO! Such an amazing quilt.:)
ReplyDeleteLove this quilt front to back.
ReplyDeleteI had no fear of that little bird ha ha
You must have seem something I didn't ha ha.
I'm glad you are happy with the your frankien-bird
This really made me laugh! I would never have thought to swap just the head but it is just a clever solution.
ReplyDeleteI have so enjoyed following along on this project. Thank you for that. As much as I enjoy the front, I equally delight in the back with the toile, swoon! Can't wait to see what follows.
ReplyDeleteRondi
rondiquilts@yahoo.com
Wendy, another beauty in the making and you did improve that poor little bird. It's nice that we quilters can take liberties like that;).
ReplyDeleteBoy, you are tough on the birds! I guess the voted off one got off easy. At least you didn't chop off his head - lol. Have fun with your Franken-bird (he is cute).
ReplyDeleteLove your quilt, both sides are FAB!
I just love this quilt--front and back. And that poor little bird now has a new head. I thought he looked fine before surgery but so glad you will now be able to sleep :) Most important!
ReplyDelete